Showing posts with label Funny Moments. Show all posts

Monday, July 14, 2025

Infinite Space Insights: Preventing a Yellow Kawangi Invasion?

Infinite Space Insights: Preventing a Yellow Kawangi Invasion?

With Infinite Space III: Sea of Stars handling the Yellow Kawangi Invasion quest differently compared to earlier games, and even removing the unique item flag on specific items for good measure, you may be surprised to find out that these changes make it possible to prevent the Yellow Kawangi Invasion quest from starting at all. Here's how you can do it.
  1. Make sure the map does not fulfill any of the requirements for the other four quests (Ravian Invasion, Urluquai Crusade, Primordius, or Swamp Pirate Rebellion). In that case, the Yellow Kawangi Invasion will be the only quest that can be triggered.
  2. If the above requirement is met, play normally and explore every star system on the map except for the one where the Limited Vacuum Collapser can be found. Be warned that visiting that particular system will start the quest, and you'll never know what you'll find in a system .
  3. Ensure that you have a Timeless Bauble in your cargo bay. This item can be activated and converted to any other item by typing its exact name.
  4. Create a second Limited Vacuum Collapser (which is no longer a unique item in Sea of Stars, and hence can be created even if one already exists on the map) from the Timeless Bauble.
  5. Make sure there is at least one star system within five light-years of the first Collapser. 
  6. If such a system exists, move your fleet to that system, then activate the second Collapser (the one currently in your possession), making sure to set the fuse timer to a value that allows your fleet to escape from the blast radius before detonation.
  7. Once you've reached a safe distance, stand back and watch the fireworks. The moment the star system containing the first Collapser is overwritten, the Yellow Kawangi Dreadnought will not spawn on the map at all.
Obviously, you will not be able to pull this off this trick if you are unable to perform any of the steps above. But if you can do it, you'll spare yourself a lot of hassle in dealing with a Yellow Kawangi Dreadnought, regardless of whether or not you do so in direct combat.


Above, from top: This Sea of Stars playthrough was unusual in that I was able to prevent a Yellow Kawangi invasion before it even began - by creating a second Limited Vacuum Collapser using a Timeless Bauble, followed by detonating the second Collapser within five light-years of the system containing the first Collapser (which would've triggered the quest if discovered) before I'd even visited it, thus overwriting that particular system and preventing the Yellow Kawangi from arriving at all.

In short, it takes a lot of luck (and a little bit of skill) to pre-emptively prevent a Yellow Kawangi incursion before their Dreadnought enters the sector map, but it's theoretically possible. Just don't expect to gain 5000 extra credits (which can only be acquired by destroying the Dreadnought after it has appeared, before it annihilates your home system of Glory) if you pull it off, though.

Tuesday, July 1, 2025

Hotshot Tales, Part 13: Sea View Slugfest

Hotshot Tales, Part 13: Sea View Slugfest

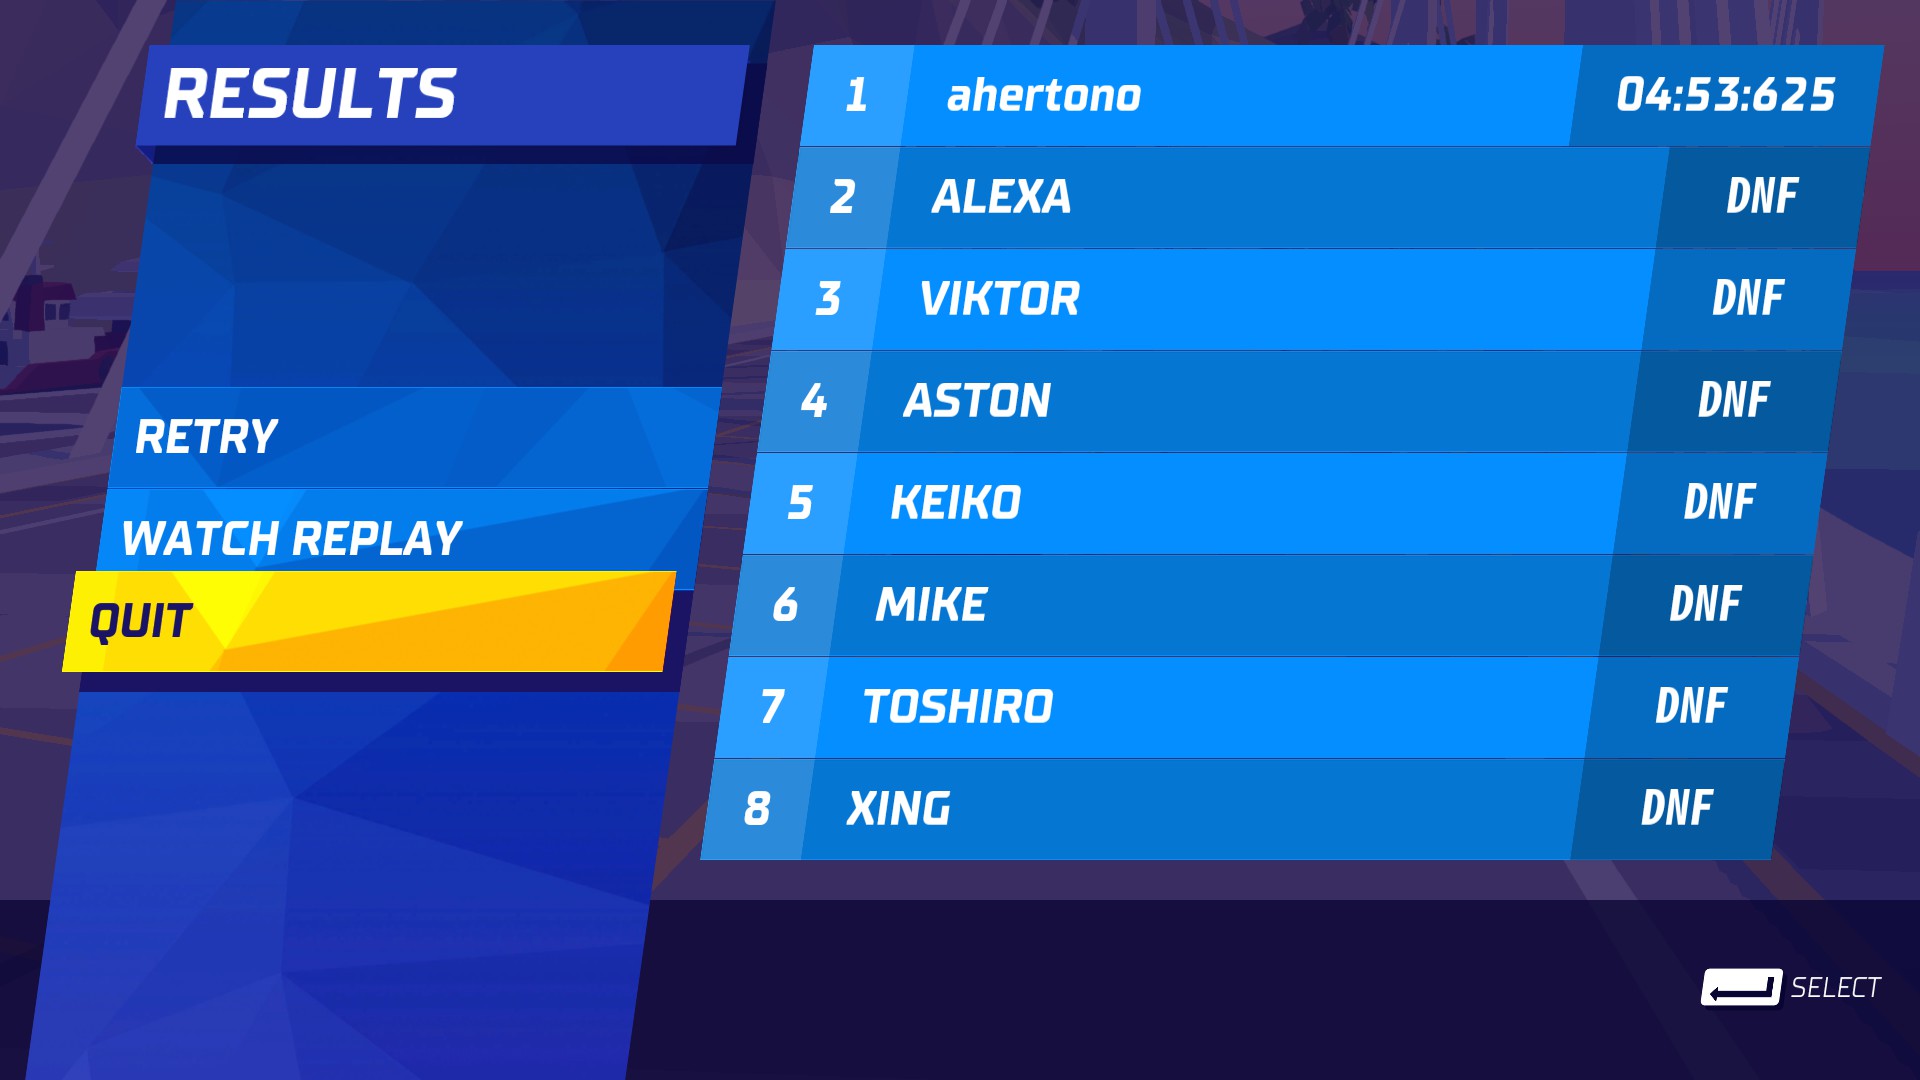
Remember when I scored six kills in a single Barrel Barrage race in Hotshot Racing, on the Downtown variant of the Desert map? Well, I did it again, but on the Sea View variant of the Coast map. This time, though, I came very close to scoring a seventh kill right at the very end, and in fact would've done so if the last opponent hadn't taken themselves out by driving straight into a barrel I hadn't placed.

The recipe for this rampage was simple: take the fastest car (Marcus' Carbon) on the longest race (7 laps), in the fastest speed class (Expert), and wreak as much havoc as possible until you get eliminated or finish the race (whichever comes first). Also be sure to avoid running out of time, and prioritize survival over speed where possible if you're the last player standing. And so, the challenge was on.

Right from the start, I jumped out to an early lead from the back, thanks to a perfect launch (which occurs when you keep the RPM in the yellow zone on the tachometer when the starting countdown ends). Just before the last turn of the second sector, I got my first hit (against Aston's Shadow), even though it meant hitting the outer wall. I quickly recovered to catch back up to the leaders, and on the next lap, hit Xing (in a Blaze) twice to eliminate him - my first kill of the match. And shortly before completing the second lap, I managed to get a double hit against Aston and Keiko at the same time (the latter of whom was driving an Eight Rock). 


Above, from top: It didn't take me very long to get my first kill in this match - and I even scored a rare double hit for good measure.

I scored no eliminations on the third lap, but got two of them a few seconds apart on the next one: Toshiro's Wild Line and Mike's Eagle. Both of them got taken out when each of them hit a barrel I'd placed earlier, to serve as a trap. And then Keiko bit the dust when she slammed into another barrel I'd left behind after completing the first sector. It was mostly quiet from then on, until Aston succumbed to the pressure and fell into yet another barrel trap I'd placed before the S-curve in the second sector - right before I commenced the seventh and last lap.


Above, from top: Three kills within just a few seconds on the fourth lap is quite impressive, especially since there was only one opponent challenging me for the lead by then - the other two kills were against rivals who had fallen very far behind.

The last lap left me with a crucial decision: Should I go for at least one kill, or simply cruise to an uncontested victory instead? Feeling brave, I went for the former, and quickly caught up to Viktor's Rennen - I took it out with one hit, after realizing that it had already been critically damaged from multiple previous barrel collisions. I then set my sights on Alexa's Mirage, only for it to disappear when it, too, drove right into a barrel before it could start its last lap of this race. So it wasn't the total wipeout I'd been expecting, but 6 kills in a single Barrel Barrage is still an amazing showing by any standard.


Above, from top: I missed out on a seventh kill by a whisker, but I still got two more kills in the closing laps to bring my total to six - which is still an impressive result.

Any Barrel Barrage in which the same player scores six kills is rare, but this one is noteworthy for how much closer I came to getting seven compared to the previous one. Thankfully, there is no achievement for such a feat, because it's extremely difficult to pull off.


Above: Some of the highlights from this chaotic Barrel Barrage on Sea View in which I scored six kills - and came within a whisker of claiming a seventh.

In short, I didn't expect to do so well in this Barrel Barrage, but I'm lucky and grateful that I did - although I could've done better, but not by much.

Wednesday, April 9, 2025

Infinite Space Insights: Building the Ultimate Custom Capital Fleet

Infinite Space Insights: Building the Ultimate Custom Capital Ship Fleet


After thousands of playthroughs in Infinite Space III: Sea of Stars, there was one question above all others that puzzled me: What is the best fleet of four capital ships you can have in the game? It did not take me very long to realize that such a fleet would need a balance of speed, agility, firepower, and defenses. Eventually, I settled on having one each of a Terran corvette, a Zorg corvette, a Garthan frigate, and a Calatian destroyer as my capital ships - I never deploy fighters in combat during regular gameplay, but the two fighter slots in the fleet are free, so I could choose from any faction regarding those, although the Zorg and Garthan fighters are generally considered the most useful in custom battles.


Above, from top: This custom fleet contains one each of a Terran corvette, a Zorg corvette, a Garthan frigate, and a Calatian destroyer - all of which have been upgraded with the best weaponry and technology the game has to offer.

All four capital ships in this fleet are fitted with Temporal Flux Shields (for maximum defense), Reactionless Thrusters (to maximize agility and speed during combat), Plasma Coil Cloakers (for increased stealth), Sardion Maximizers (which provide the greatest increase in accuracy and fire rate), and Multibot Repair Drones (which are the most effective means of repairing hull and component damage). In addition, with the exception of the Calatian destroyer, each capital ship also carries a Signature Projector (the most advanced ECM system for deflecting incoming missiles) and a Tachyon Ray Gun (the best weapon to use against fighters). The first capital ship in this fleet will be a Terran corvette with a Nova Cannon for its primary weapon. This makes it a highly effective sniper at long range, especially against larger, slower-moving targets. A Zorg corvette armed with a Particle Vortex Cannon (the only primary weapon that is effective at long range at all ranges) will occupy the second capital ship spot, while a Garthan Frigate loaded with two Cobalt Torpedo Tubes (the best homing weapon by far, with its high muzzle velocity) takes up the third such slot. Finally, the last capital ship will be a Calatian destroyer carrying four Proton Blasters for shooting down fighters and missiles at short to medium range.

Usually the best way to use most of these vessels in these configurations is in a sniping role facing the target(s) head-on, with the Calatian destroyer positioned near any of the other three capital ships to act as an "iron dome" against fighters and missiles. However, it's also possible to trap the opposing fleet in a pincer movement with the force composition I've suggested, by having the Terran corvette and Garthan frigate lurk behind the target(s) with their cloaking devices (only decloaking to attack, before reactivating their Cloakers if they are targeted), while the Zorg corvette and Calatian destroyer lure them forward into a trap. Although this tactic can also be attempted with other capital ship types and loadouts, I've found this particular one to be the most effective of all for this approach. This strategy also works with just the Garthan frigate and Terran corvette positioned ahead of and behind the target, respectively.


Above, from top: My custom fleet taking on some Urluquai vessels in a custom battle. After taking out the Urluquai flagship (an Urluquai carrier), I ordered my capital ships to turn around and open fire on the Urluquai Deep Hunters that had just decloaked and opened fire on my fleet.

Against Yellow Kawangi Dreadnoughts, however, the Zorg corvette and Calatian destroyer lack the long-range punch (in terms of raw alpha strike damage at such extreme ranges, as opposed to damage per second at closer ranges) to take down these behemoths with sustained fire, even with cloaking devices installed, so the respective loadouts for the Terran corvette and Garthan frigate are the only viable options in this specific scenario, where the Dreadnought's Temporal Flux Shield and Multibot Repair Drone give it nigh-impregnable defenses, bolstered further by four Graviton Disintegrators (two on each side) and a rear-facing Proton Blaster. Those weapons, however, cannot outrange a Nova Cannon (which the Kawangi dreadnought has by default), to say nothing of the even longer-ranged Cobalt Torpedo Tube (the latter of which is standard equipment only on the Damocles, although you can't encounter that particular vessel and a Yellow Kawangi Dreadnought in the same playthrough, or even have them face each other in any custom scenario).


Above, from top: The customized Garthan frigate and upgraded Terran corvette (positioned in front of and behind the target, respectively) team up to destroy a Yellow Kawangi dreadnought by trapping it in a pincer movement.

Even so, the force composition I proposed in this post may turn out to be the most effective one there is in a custom battle. It is possible to create a similar set of loadouts with the same capital ship classes in a regular game, but there are a few necessary differences: replacing the Cobalt Torpedo Tubes with Multi-Missile Launchers (which do not require the presence of the capital ship Damocles on the map to obtain), downgrading the Sardion Maximizers to Sardion Optimizers at best on most or all of the capital ships, and even then, the Zorg, Calatian, and Garthan home systems must all be present on the map to get anywhere close to the loadout I have suggested.

In short, this fleet composition and loadout combination I have suggested may just be the most overpowered one (assuming no duplicates of any capital ship class are being used), although there are a few that come close. The most promising alternative combines a pair of Terran destroyers with the Kestrel and a Muktian destroyer, with the Terran destroyers carrying 3 Multi-Missile Launchers each while the other two capital ships have two such Launchers each - but even with Proton Blasters filling all the remaining hardpoints on those capital ships, this fleet still uses two of the same unit (in this case, a Terran destroyer) from the same faction. So if you absolutely must avoid using the same unit more than once in a custom fleet, this setup is off the table, but the one that's the primary subject of this post most definitely isn't.

Monday, July 15, 2024

Hotshot Tales, Part 7: The Kerb Ramp Glitch at Alpine Town

Hotshot Tales, Part 7: The Kerb Ramp Glitch at Alpine Town

Although there are very few bugs in Hotshot Racing, one of them has remained unpatched to this very day: the Kerb Ramp. You can trigger it by hitting the edge of the inside kerb at Alpine Town (the fourth layout of the Alpine map) while boosting. This isn't guaranteed to occur every time, but when it does, your car will be launched high into the air. Sometimes, it will even fall through the ground and into a bottomless void, before respawning on the track. However, performing the Kerb Jump will also reduce your speed significantly, so it is inadvisable to do this on the final lap unless you have a very large lead (or, in Drive or Explode or Barrel Barrage, a totally unassailable one).


Above, from top: An extreme example of the Kerb Ramp glitch, the most infamous bug of Hotshot Racing, in action - hitting the inside kerb on the final corner at Alpine Town may launch your car into the air. On this occasion, I even fell through the ground and into an endless void, before respawning on the ground - but not without losing a lot of speed in the process. I had also triggered the glitch  previously in this race, but without falling through the road. Nevertheless, I was still able to finish in first place.

It's a very funny, but rare, glitch that can literally decide the outcome of a race under specific circumstances. However, given the fact that triggering the glitch would cause a huge loss of speed, it is inadvisable to do so in high-level play, except in situations where you are the last remaining player in a  Drive or Explode or Barrel Barrage race, and the resulting loss of speed and control is not guaranteed to lead to your elimination.