Tuesday, October 25, 2022

Wanton Destruction on a Galactic Scale: When is it a Good Idea, and When is it Not?

Wanton Destruction on a Galactic Scale: When is it a Good Idea, and When is it Not?


I've already explained in earlier posts how you can obtain (and use) a Limited Vacuum Collapser more than once in Infinite Space III: Sea of Stars, but this time I'll show you why allowing a player to do so more than twice would not be a good idea. To give you an example, here are several screenshots from a recent game I completed.


A Limited Vacuum Collapser is not something to be used lightly - it must be set up so that it detonates at the right place and time - but it's sure to produce spectacular fireworks when it goes off.

In the game described here, I found a Limited Vacuum Collapser in the Duet star system, and I immediately headed to the Tchorak home system to find out if a Kawangi Dreadnought would visit it (or any other star system on the opposite side of the map from the Terran home system of Glory). My hunch turned out to be correct, so I decided to detonate the Collapser in the Viveka system (which was less than five light-years away from the Tchorak home system, and also close enough to Duet to ensure that both systems would also be caught in the blast). The resulting vacuum collapse not only erased both the Tchorak home system and the Kawangi dreadnought from existence, but also destroyed a Muktian flotilla that didn't evacuate in time. In addition, the destruction of the Duet system prevented me from exploiting the Kawangi respawn bug, but I didn't care.

Later on in the game, I discovered a Timeless Bauble, and decided to use it to create another Limited Vacuum Collapser. This time, I decided to detonate it in orbit around the black hole Monstro, after realizing that the Urluquai and Tan Ru home systems were less than five light-years away from it. Keeping this knowledge in mind, I retreated to a safe distance and watched the fireworks as two hostile factions - and three whole star systems - were wiped off the map along with any and all flotillas within the blast radius. Fortunately, my flotilla was not among them (if it were, the game would immediately end), but that made it impossible to trade in some cargo for a piece of advanced Urluquai technology (such as a Plasma Coil Cloaker) from then on. Again, though, I did not care one bit - the 5000 credit bonus for destroying a Kawangi Dreadnought was more than enough to field and heavily upgrade a fleet of two Terran Frigates, a Garthan Frigate, and a Calatian Cruiser. Besides, I had already purchased enough Cloakers to equip each and every one of my capital ships (i.e. anything larger than a fighter but is not a space station) with one of these devices.


Using a Limited Vacuum Collapser to destroy a home system (or, in rare circumstances, more than one of them) is not a good idea (especially if any of them is your own, or that of any faction that starts out neutral or allied), but if any the system(s) in question is/are those of an initially hostile faction, it may well be worth it - especially if their flotillas are also caught in the blast.

All told, I destroyed six star systems (including three alien home systems), one black hole, and four flotillas (of which one was comprised solely of a Kawangi Dreadnought) in this game. It is worth noting that in Sea of Stars' predecessor, Weird Worlds, using a Limited Vacuum Collapser is treated in-universe as a last resort, since such acts of wanton destruction would have incurred a 1000-point penalty apiece at the end of the game, but for some reason, this rule no longer applies in Sea of Stars.

This brings us to the topic of this post: What if you could detonate a Limited Vacuum Collapser more than twice in the same game? Well, for starters, it would not be a good idea: every randomly generated map in Sea of Stars initially contains 32 star systems and 5 black holes, and since an LVC detonation is guaranteed to permanently remove at least one of the former from the map (although depending on where the epicenter is, such a cataclysmic event could destroy more star systems at once, in some cases up to five or even six), a double LVC explosion will reduce the number of systems to 30 at most. Taking the game described above as an example,  I erased three systems from the map with each use of the LVC (6 in total), leaving 26 systems still on the map, and there was a huge void of empty space where those annihilated systems used to be. Worse yet, if each detonation had destroyed six systems each instead of three, there would have been only 20 stars left on the map.

Taking the idea further, giving a player an infinite supply of Limited Vacuum Collapsers would make it possible for them to destroy the entire sector (or at least annihilate every star system that isn't Glory) which would make the game unwinnable. Even with one LVC "explosion", you're looking at up to just under a quarter of the sector gone in a flash - and with two detonations, up to a little over a third of the map's star systems will be lost forever in total. Moreover, if you haven't explored any or all those systems before they disappeared from the sector map due to the vacuum collapse, you will never be able to do so for the rest of the session, which may make the game harder (or even impossible) to complete depending on what was spawned there at the start, and even if it doesn't, it reduces the number of star systems you can explore, which will reduce your final score, of which exploration contributes a significant amount.

And what if the Limited Vacuum Collapser's area of effect were changed in size? Consider what would happen if an LVC wiped out a larger part of the map with each blast. For example, if the blast radius of an LVC were to be doubled in size (to 10 light-years instead of the usual five), you'd erase much more of the sector with each detonation, and have far more difficulty escaping from the blast zone - as well as placing your own system (Glory) at greater risk of destruction each time. On the other hand, reducing the blast radius, say to three light-years, would make the LVC more of a precision weapon, with no chance of collateral damage (since all star systems on the map must be at least three light-years apart from each other), by completely removing its ability to destroy any star system other than the one in which it was detonated. This, however, would also create at least as many problems as it could potentially solve, such as having to be far more precise with the location and timing of the blast to take out an invading Kawangi dreadnought, so in general, changing the blast radius of an LVC would not be a good idea.

Overall, it's a good thing that none of the games in the Infinite Space trilogy will allow you to cause more than two localized vacuum collapses (with a blast radius of five light-years each) in the same session. The series as a whole was (and still is) mainly about exploring distant star systems, not destroying them; as such, excessive wanton destruction would largely defeat the whole point of the game. To ram the point home, the Limited Vacuum Collapser and Timeless Bauble (the latter of which may be used to create another LVC) do not always spawn on the map when starting a game, and if the former is present, its use is not always required to actually complete the game; in Sea of Stars, you may even sell it at Glory for 1000 credits if you're short on cash. So while it's great to know that you can annihilate an entire star system (or several of them) at the push of a button, you'll be glad that doing so isn't necessary for complete mastery over the Sea of Stars.

Monday, October 24, 2022

Confessions of an Automationeer, Part 122: Hatching a Plot

Confessions of an Automationeer, Part 122: Hatching a Plot

After taking a break from QFC 11 having hosted QFC 10, I jumped at the chance to enter the very next QFC, which was themed around early 1990s hot hatches. It took me several days to come up with an entry, and after several revisions, I ended up making a small but hard-edged pocket rocket: the AMS Vanga 2.0 RS.


Do not be fooled by its small size - the AMS Vanga 2.0 RS has a big heart to match its appetite for corners.

I had originally planned to use a 1.8-liter straight-four for this build, but after evaluating the strengths and weaknesses of the other entrants, I went with a 2.0-liter unit instead.


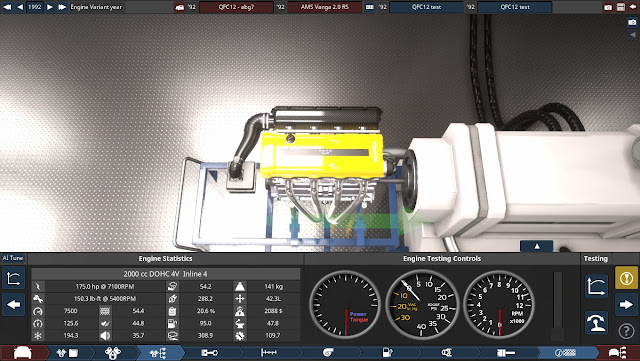
Small in displacement but packed with power (for a normally aspirated engine of this size and era) - that's the Vanga's engine in a nutshell. (Since this screenshot was taken, I changed the name of both the engine family and variant along with the color of the valve cover, which is now red instead of yellow.)

The Vanga was meant to be a true driver's car, and it shows. To remain within budget, I had to remove the center rear seat, power steering, and anti-lock brakes (although I stated that all of these items were optional); it did, however, come with a mid-range stereo and cassette tape player. As for the rest of the car, I decided to tune the suspension (struts up front and a torsion beam in the rear) mainly for performance (without sacrificing too much comfort) and install large vented disc brakes on all four corners. To send all that power safely to the front wheels, I fitted a close-ratio 5-speed manual gearbox and a geared limited-slip differential.

All in all, at $21,000 AMU when new, the ultimate version of the Vanga is a very good deal in terms of value for money - not even the compromises made in creature comforts are enough to mark it down, if you are willing to accept them.

While this version of the Vanga didn't make the top 5, it did leave behind a positive impression on the client. It wouldn't be the only trim, though: I also made a Touring spec (with ABS, power steering, a fifth seat, and more safety equipment as standard - all of those were optional on the base model) for those who wanted a more livable choice.


The Touring spec - not as raw as the base model, but a better everyday proposition.

At $23,500 AMU, the Touring spec is not that much more expensive than the base model, and while it is not quite as hard-edged due to its extra weight, it's still a highly capable pocket rocket.

Thursday, October 20, 2022

Confessions of an Automationeer, part 121: A Dip in the (Tech) Pool

Confessions of an Automationeer, part 121: A Dip in the (Tech) Pool

We have already discussed the recently introduced Automation sandbox tech pool, a feature that can be used to accelerate the development of specific components, thereby ensuring earlier availability of certain items in that category. This requires the use of positive tech pool points, of which you can assign up to 15 for any given component. Speaking of components, the tech pool chart lists a total of 16: 6 for the engine (block/head, bottom end, top end, turbocharger, fuel system, and exhaust) and 10 for the car (body, chassis, drivetrain, wheels/tires, brakes, aerodynamics, interior, safety, assists, and suspension).


A glued aluminum chassis shouldn't be available in 1999...

For example, a glued aluminum chassis is normally available only from 2000 onwards. However, with the use of the tech pool, you can select it at an earlier year than usual. Taking the 15-point limit into account, it is possible to have this option as early as 1985. Granted, this is highly unrealistic, but the fact is that you no longer have to wait as long in-game as before to utilize this expensive weight-saving technology for a sandbox build.


...unless, of course, you advance the chassis tech pool by 1 year.

But what about using the tech pool to have the opposite effect by adding negative points? This could actually serve a purpose in-game by simulating the effects of a company introducing a specific item later than the usual industry standard. And whereas positive tech pool points reduce production units, engineering time and overall cost, negative tech pool points will increase all of those. 

There is a catch, however: The most recent in-game year for a car and its engine is 2020, so in theory, using the negative tech pool to delay the availability of any item to after 2020 will effectively make that item impossible to use. To give another example, the luxury HUD-based infotainment system is only available from 2017 onwards, so using a negative tech pool value of -4 for the interior would prevent it from being selected at all, even if the trim year is set to 2020.

Taking all of the above into account, if negative tech pool points are ever implemented in Automation, it would introduce the possibility of a third scenario: assigning positive points to some components and negative points to others. This is intriguing, to say the least, since a company could, in theory, be ahead of the industry standard in some areas and behind in others. As such, simultaneous use of positive and positive tech pool points would be the only way to simulate this situation.

This brings us to the concept of a net tech pool, which would be the sum of all tech pool points across all categories. The resulting value would determine how far ahead or behind the industry standard a company would be overall. For any given car, its overall net tech pool value would be the sum of the net tech pools for the trim and engine; if this value is negative, then its manufacturer is generally playing catch-up research-wise, but if this value is positive, then its manufacturer is generally on (or ahead of) the cutting edge of research.

In short, implementing negative tech pool values would open up a whole new set of possibilities, from merely simulating a company lagging behind research trends, to offsetting positive tech pool points elsewhere in fan-made challenges that allow tech pool adjustments within a set net tech pool limit.

Thursday, October 13, 2022

A Lifer's Diary, Part 2: Wheely Good Fun

A Lifer's Diary, Part 2: Wheely Good Fun 

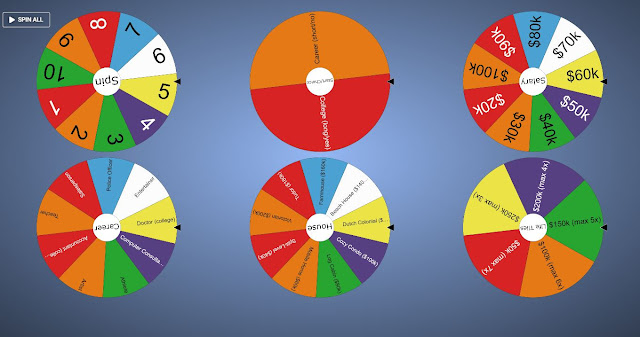
Shortly after making a set of spinner wheels for simulating a Game of Life using the Generation III rule set, I came up with the idea of doing the same for the earlier Generation II rule set. Here it is:


A set of spinner wheels that can be used to simulate a Game of Life using the Generation II rule set. This time, there are only six wheels, including one each for every career, salary and house present in this version of the game.

In this version, there are a total of six wheels; they are as follows:
  • Spin: Created to simulate the spinner in the real-life board game (or a 1d10/10-sided die, which is functionally identical if you treat the 0 as 10), each player must spin this wheel once at the start of their turn. In addition, each player must spin this wheel once at the very start of a game to determine the order in which they take their turns. Any player who lands on the Pension space must also spin this wheel once, after which they will earn $20,000 multiplied by the number they spun (compared to $10,000 per number spun in Generation III).
  • Start/Choice: This determines whether or not a player goes to college at the start of a game, and whether or not they take the longer of the two routes when they reach a fork in the Path of Life. It is also used to determine whether or not a player will follow the instructions on a blue space (Night School and Trade Salary Card) upon landing on them.
  • Salary: When selecting a new salary (unless going to College or entering Night School), a player must spin this wheel once. If going to College or Night School, spin this wheel three and two times respectively, discarding a result if it is already taken.
  • Career: When selecting a new career (unless going to College or entering Night School), a player must spin this wheel once. If going to College or Night School, spin this wheel three and two times respectively, discarding a result if it is already taken or if the spinner lands on a career that requires a college degree, but the player whose turn it is currently lacks a degree.
  • House: Each player must spin this wheel once when they land on the Buy a House space, discarding a result if it is already taken. Note that the "sell house for 150% of its original value upon retirement" house rule is optional, but I would prefer to implement it to incentivize purchasing the more expensive houses.
  • Life Tiles: As with the wheel of the same name from the Generation III set I made earlier, each space on this wheel represents a different Life Tile denomination and how many times at most it can be spun. When all players reveal the values of the Life Tiles in their possession, spin this wheel once for every Life Tile they have, but if the spinner lands on a space for which you have reached the maximum number of spins (3 spins for $250k, 4 spins for $200k, 5 spins for $150k, 6 spins for $100k, and 7 spins for $50k), spin again until it lands on a value for which you have not reached the spin limit for that denomination. Note that all Life Tile values are 5 times larger in Generation II compared to those Generation III.
With this set of spinner wheels, I can finally simulate a Game of Life using the Generation II rule set - the first one I grew up with. It's a simpler set compared to the one I made for Generation III (6 wheels instead of 8), but it works equally well for its intended purpose.

Wednesday, October 12, 2022

A Lifer's Diary, Part 1: New Set Of Wheels

A Lifer's Diary, Part 1: New Set Of Wheels


Not long after discovering the spinner wheel set used for the CEL Challenge, I quickly realized that it could be used to simulate Hasbro's Game of Life. There was just one problem: there could be no more than eight wheels for any given set, but I was able to work around this. After due consideration, I came to the conclusion that Generations II and III lent themselves better to being simulated with a set of spinner wheels, so I decided to start by making a set for the former. The resulting wheels are shown below.


A set of spinner wheels that can be used to simulate a Game of Life (Generation III).

The functions of each wheel (left to right, row by row) are as follows:
  • Spin: Created to simulate the spinner in the real-life board game (or a 1d10/10-sided die, which is functionally identical if you treat the 0 as 10), each player must spin this wheel once at the start of the game to see who goes first, and at least once for every player as they move along the board. Also spin this whenever any player lands on the Pension space, or is in a Spin to Win.
  • Start/Choice: Spin this wheel once for every player at the start of their first turn, to determine whether or not they go to college; if they do so, they must borrow $100,000 to pay their tuition fees. The result of such a spin determines which one of the next two wheels is spun when that player gets to choose a career. In addition, this wheel is used to simulate a player's choice between taking a new college career or a $20,000 Pay Raise for their current one. Under this circumstance, the "Career" option simulates the Pay Raise, and the "College" option simulates the career change (although this is not available if all other College Careers are taken, in which case the "Career" option will be chosen automatically). This wheel also simulates whether or not a player makes certain decisions upon reaching a Stop Space other than the first two on the board, such as returning to school, taking the Family Path, trading up to a House, and taking the Risky Path of Life: in this case, if the spinner lands on Career, the player rejects the offer, but if the spinner lands on College, the player accepts the offer.
  • Normal Career: This wheel can only be spun whenever a player chooses a normal Career Card. Note that any player who does so when landing on a Lose Your Job space must immediately return all of their Pay Raises to the bank. Each space on this wheel shows a different Career and its corresponding salary range. If the wheel lands on a space that represents a career belonging to any player (including the one whose turn it is), spin again until it lands on a space representing a currently unused Career (unless all other normal Careers are taken, in which case this wheel will not be spun; instead, that player must retain their current Career, but they must also return their Pay Raises as usual).
  • College Career: This wheel must be spun twice (or once if only one College Career is available) whenever a player chooses a College Career Card. Note that any player who does so when landing on the Change Career space must immediately return all of their Pay Raises to the bank. Each space on this wheel shows a different College Career and its corresponding salary range. For each spin of this wheel, if it lands on a space that represents a career belonging to any player (including the one whose turn it is), spin again until it lands on a space representing a currently unused College Career (unless all other College Careers are taken, in which case this wheel will not be spun; instead, that player must retain their current College Career and receive $20,000 in Pay Raises).
  • Share The Wealth: Spin this wheel three times for each player at the start of their first turn, and once for whenever a player lands on a Take a Share The Wealth Card space.
  • Starter Home: Any player who lands on the Buy a Starter Home space must spin this wheel once to determine the Starter Home they will buy. Each space on this wheel shows the name of a different Starter Home, along with its purchase price and resale value. If it lands on an option that is already taken (including by the player whose turn it is), spin again; if only one Starter Home is available, it will automatically be sold to that player. Note that Starter Homes are mandatory purchases; Houses are not.
  • Life Tile Value: Each space on this wheel represents a different Life Tile denomination and how many times at most it can be spun. When all players reveal the values of the Life Tiles in their possession, spin this wheel once for every Life Tile they have, but if the spinner lands on a space for which you have reached the maximum number of spins (3 spins for $50k, 4 spins for $40k, 5 spins for $30k, 6 spins for $20k, and 7 spins for $10k), spin again until it lands on a value for which you have not reached the spin limit for that denomination.
  • House: Any player who lands on the Buy a Better Home space must spin this wheel once if they choose to trade in their Starter Home for a new House. Each space on this wheel shows the name of a different House and its purchase price (the latter of which is also identical to its resale value). If it lands on an option that is already taken (including by the player whose turn it is), spin again; if a player reaches the Buy a Better Home space when only one Starter Home is available, it will automatically be sold to that player. Note that Houses are optional purchases, unlike Starter Homes.
With the set of spinner wheels described above, I hope I can more easily simulate this version of the Game of Life than ever before. In fact, I could create a similar set for Generation II, but any versions of the Game of Life from Generation IV onwards (as well as Generation I) may be less well-suited for such a project; as such, I have less interest in making spinner wheel sets for those. Even so, if and when I choose to simulate another Game of Life (using the Generation III rule set), I will certainly use this specific set of spinner wheels.

Monday, October 10, 2022

Confessions of an Automationeer, Part 120: Powering Up

Confessions of an Automationeer, Part 120: Powering Up

Now that Automation has received several very significant updates in the past few weeks, I feel like it is the right time to describe some of them in more detail. Their combined effect is that we, as players, must now rethink how we build cars and engines compared to previous builds. This has happened before in the past, but seldom on a scale as large as this. On that note, let's take a closer look.


The revised bottom end tab in the engine designer for Automation LCV 4.2.23 and up, showing the new balancing mass slider - more mass equals greater reliability and smoothness, while less mass equals less weight and better throttle response.

The first major update to Automation in some time (LCV 4.2.23) has brought with it a complete overhaul of how engines work, thereby making them more realistic than before. For starters, engine data is calculated for 1% throttle increments as well as for every 100 rpm. You can now adjust more stuff than before, such as carburetor, header and intake manifold sizes, as well as the VVL activation point on the rev range, and bottom end balancing mass weight. 


The top end tab has also been revised to show RPM limit and VVL activation RPM sliders. A fueling map is also shown here.

In addition, there are some new fuel types to choose from, and there are now three cast-iron header types (compact, low and mid) instead of two. There are many other improvements as well, and the air/fuel ratio slider is now a fuel map slider, while the ignition timing is automatically adjusted (hence the absence of an adjustment slider, as had been present in previous builds).


A timing map is also new for 4.2.23 and up, while the turbocharging tab (ghosted here due to the engine shown here being normally aspirated) allows for boost adjustments in increments of 0.05 bar.

To accompany these changes, there are now additional graphs for various attributes; moreover, flow ratings are now shown as percentages of optimum air flow (the closer to 100%, the better). On top of this, the maximum RPM slider is now in the top end tab, and a whole new set of warnings have been added. Overall, designing a viable engine for any application is now more challenging, but also more rewarding than before.


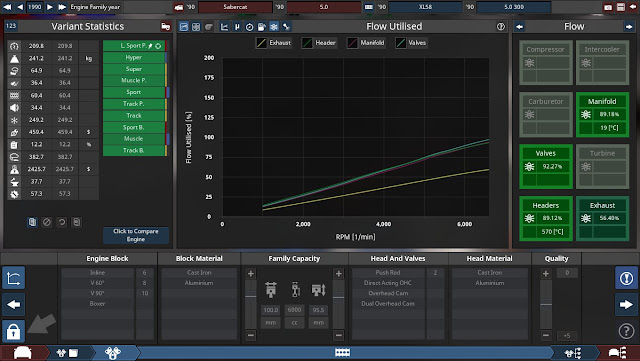
Above, from top: Other new stuff introduced in LCV 4.2.23 - graphs for flow utilization, fuel efficiency and friction mean effective pressure, plus several more sliders for carburetor, intake manifold, exhaust header and exhaust pipe size. The fuel mixture slider is now a fuel map slider, while the ignition timing slider has been removed to account for the fact that ignition timing is now adjusted automatically. There is now an octane margin setting, and cast headers come in compact, low-RPM, and mid-RPM varieties, while the standard tubular headers are now referred to as Tubular Mid. Finally, there is a 4 Split Mode for viewing graphs, which shows output, timing, fuel efficiency and flow utilization graphs all at once.

The trim section of the car designer has also been revamped for the latest build. In addition to the inclusion of a selectable fuel efficiency graph (which aids in configuring gearing for economy, if you need or want it), the minimum rear braking force has been reduced further, to 20% of its maximum value. Also, throttle response now affects sportiness and wheelspin: the more responsive an engine is, the sportier it will be (and the more wheelspin it will generate).


The transmission tab has been updated for LCV 4.2.23, and shows an option for a clutched LSD - less effective than a geared equivalent, but available sooner. A fuel efficiency map is also shown here.

Furthermore, the fixture tab now has a new set of buttons and commands (such as clone in place and flip with mirroring), while fixtures, paints, advanced trim settings and morphs can now be copied through the clipboard and even other cars. Speaking of advanced trim settings, they now include tire shine and tread depth settings, both of which can be adjusted through sliders. In addition, all calculations have been reworked in this new build, and some new bodies have been added in addition to, or in place of, existing ones that have been present for quite some time.


Additional options (such as cloning in place and flipping to the opposite side) have been added to the fixture manipulation section of the fixtures tab.

After the release of LCV 4.2.26, engines are now even more realistically depicted than before. For example, direct injection has been nerfed slightly, minimum boost is now 0.05 Bar (with boost now being adjustable in increments of 0.05 Bar) while standard manifolds have had their airflow buffed, and all mufflers and catalytic converters now have backpressure effects, with torque outputs being increased slightly across the board to account for this. In addition, advanced automatic transmissions can have up to 10 gears (depending on the era), while dual-clutch transmissions can also have more gears. As for suspension tuning, the maximum value for springs and dampers is now 20 instead of 10.

The most significant change stemming from this update is the addition of a new feature to the sandbox: the tech pool. It is meant to simulate the amount of R&D a manufacturer has undertaken, often for the purpose of reflecting the company's lore. This reduces production units and engineering time for a specific component, but more importantly, unlocks certain parts sooner by shifting the year for that part forward by a set number of years. 


Introduced in LCV 4.2.26, the Tech Pool is a new feature that allows you to unlock some parts sooner - you can even copy and paste tech pool values between trims. By default, each part has a tech pool value of 5, although you can change this as you see fit.

With this in mind, you can also copy tech pool settings to the clipboard for future use, and paste them if you want to reuse them on another car trim or engine variant as you see fit. Before this update, all components were treated as having a tech pool value of 0 outside of the campaign mode; now, however, the default tech pool value has been set to 5 for all components. However, some forum challenges require a tech pool value of 0 across the board, in a nod to earlier versions.

The next update, LCV 4.2.27, brings with it even more changes to trim options and availability. For one, manual and (non-variable) hydraulic steering options have been split into two types each: recirculating ball and rack and pinion, with the latter providing better stats at the expense of generally higher cost. In addition to this, a clutch-based limited-slip differential is now available. The clutched LSD (as the game puts it) is more primitive than a geared equivalent, but is unlocked earlier. This avoids having to substitute an automatic locking differential (normally best suited for off-road applications) for a true geared LSD in earlier years (pre-1982 if the drivetrain tech pool is set to 0). Moreover, a clutched LSD is generally cheaper to develop than a geared one, and provides better off-road capabilities at the expense of inferior drivability.


LCV 4.2.27 introduced options for recirculating ball or rack and pinion steering for manual (i.e. unassisted) and regular hydraulic (i.e. non-variable) steering systems. 

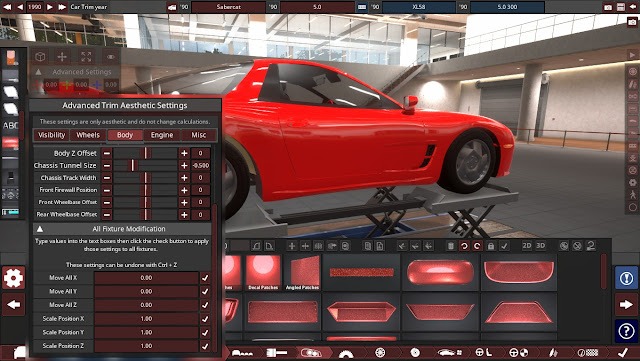
From version 4.2.28 onwards, there is now an advanced trim setting that allows you to move and scale every fixture on a given trim at once, and copy them to another, different trim - far faster than having to duplicate each fixture separately from scratch.


Above, from top: It is now possible to scale and move every fixture at once, as well as copy and paste fixtures, materials, advanced trim settings, and morphs from the advanced trim settings menu.

In addition to these updates, the developers have also released some minor patches to fix any bugs present. The effect of these is to provide a more stable and cohesive experience overall. When combined with the various major updates described above, building a car (and its engine) in Automation is now a generally more enjoyable experience - and this will be even more true once the current open beta build becomes stable enough to become the latest public release.

Update (12:00 am, UTC +7): LCV 4.2.30 introduces AFR (air/fuel ratio) dependent combustion chamber cooling effects, reducing the probability of knocking. In addition, carburetor flow and manifold/header resonance curves have been adjusted slightly to account for this, and there are several minor bug fixes as well.

Friday, October 7, 2022

Confessions of an Automationeer, Part 119: Randomizer II

Confessions of an Automationeer, Part 119: Randomizer II

I just found out that the creator of the CEL Challenge also created a set of spinner wheels for a random engine generator - a link to these wheels can be found here. You can also find an example of a randomly generated engine based on the criteria from the wheels in this video. Now, about the wheels themselves: Unlike in the CEL Challenge, there are eight wheels (the maximum the site will allow), and they are as follows:

  • Engine Type: The arrangement of the engine's cylinders. This can range from an inline-3 to a V16 and anything in between - in fact, every engine layout in Automation is accounted for.
  • Engine Size: Determines the total displacement of the engine. There are several displacement brackets, from sub-1-liter to 15-20 liters. If any displacement within the range of the bracket is impossible to attain with the configuration generated, spin again.
  • Material (spin 2 times): The material used for the block (1st spin) and heads (2nd spin).
  • RPM: The RPM limit for the engine. There are several brackets, from sub-2,000 RPM to 10,000-12,000 RPM.
  • Head: The type of head the engine has. All options (from pushrods to DOHC with 4 or 5 valves per cylinder) are supported.
  • Bottom End Parts: Determines the set of bottom end parts (crank, conrods, pistons) that will be used. There are four options: Cast (includes hypereutectic and low-friction pistons), heavy-duty cast (for conrods and pistons), forged, and lightweight forged (which includes titanium conrods and billet steel cranks)
  • Cams and Headers: The type of headers used, if the engine is naturally aspirated. All in-game options are supported. (As of LCV 4.2.23, Cast Log is now Compact Cast, and Short Cast has been split into Cast Low and Cast Mid, while standard Tubular is now Tubular Mid.)
  • Fuel System: The type of fuel system the engine will use. As with Cams and Headers above, all in-game options are supported, from single-barrel carburetors to direct fuel injection.
Unlike in the CEL Challenge spinner wheel set, the Random Engine Generator does not have a wheel that determines the choice of era, since the unlock year varies greatly from item to item. For example, Direct Injection is not available until 2001, assuming a fuel system tech pool value of 0. Speaking of Tech Pool, I am assuming that the entire set was made under the assumption that all engine tech pool values are 0, which prevents parts from being unlocked earlier than they were before the tech pool was implemented. Finally, if you choose to spin the wheels one at a time instead of all at once, you should do so from left to right, row by row.

Below is an example of a combination randomly generated using the Random Engine Generator wheel set.


An example of a randomly generated combination of engine components, created using the Random Engine Generator spinner wheel set. Here, it shows a V8 with a displacement of 3 to 6 liters, with aluminum/silicon alloy for the block and/or heads, an RPM limit between 8,000 to 10,000 RPM, 4- or 5-valve DOHC heads, lightweight forged internals, variable valve lift (either in addition to, or in place of, variable valve timing), and multi-point fuel injection.

It is possible to use both sets in conjunction with each other for a combined random car/engine combination, although the result will often be anachronistic without (and sometimes even with) use of the tech pool.

If you had fun with the CEL Challenge spinner wheel set, be sure to try the Random Engine Generator spinner wheel set - it's a blast to play with!